Bonding + Direct Veneers
BONDING AND DIRECT TOOTH COLOURED COMPOSITE VENEERS
Tooth coloured composite filling material if layered directly over an entire tooth surface is called a Direct Composite Veneer. Tooth coloured composite filling material may also be bonded over part of the tooth surface to improve the shape of a tooth, remove gaps between teeth, or mask the colour of existing teeth. Direct composite veneers are used to significantly improve the appearance of a single tooth or may be bonded to multiple teeth to create a new smile.


Before starting treatment
At your first visit it is important to discuss your aesthetic expectations and any dental problems.
It is preferable to whiten teeth prior to veneering as it is easier to mask a lighter coloured tooth than a dark tooth. All new dental work has to blend in or match the colour of the patient’s natural teeth. As most people prefer lighter coloured teeth, patientsshould whiten their teeth first so that the new dental work can match their new lighter coloured natural teeth. Porcelain and tooth coloured filling materials will not change colour.You may not be able to whiten your teeth without replacing darker old porcelain crowns.
Allow sufficient time, up to 3-4 weeks, to whiten your teeth and for the colour to stabilize before starting any active dental treatment.
For multiple veneers:- I prefer to have a trial run at making up the veneers whenever we are about to make major changes to someones appearance.It is best to make ‘Mock Ups’ of all teeth involved in the restoration work. I temporarily place white filling material over your teeth to approximate the shape of the final veneers while you watch in a mirror. It is important we get feedback from you at this stage. You are able to make suggestions and alterations at this appointment. When you are happy with the appearance of the teeth the mock up is recorded using photos and impressions.
We carry out the final bonding procedures at a subsequent appointment using the photos and impressions as our guide.
Treatment visits: Tooth coloured materials are bonded directly onto the tooth at the one appointment. Often minimal or no reduction of tooth surface is required. Old fillings in a tooth are usually replaced and may add to costs and time.
Advantages: Bonding is usually reversible and can be used as a semi permanent option prior to porcelain veneers or crowns. Direct composite veneers are less expensive than porcelain veneers as impressions and laboratory manufacture is not required. Bonding will last many years and is easily repaired.
Disadvantages: The surface of the composite used for direct bonding is not as strong as porcelain veneers and may chip, stain or pit requiring more maintenance.
CASE STUDY 1
Sue’s pre-treatment photos


Sue was embarrassed about her asymmetrical smile due to her irregular shaped anterior teeth. Her problems were:
- A retained upper right baby canine in the permanent canine position
- A very pointy upper right upper permanent canine in the place of her congenitally buy cialis online overseas missing lateral incisor
- A chipped upper right central incisor
- A small peg upper left lateral incisor tooth.
- Her lower left canine was over-erupted into the space between her left peg lateral and canine
After treatment photos:


Treatment techniques used were:-
- Tooth whitening
- Mock ups made so that Sue could see and approve the final appearance of the restorations before committing to treatment. Impressions were made of these mockups.
- Direct composite (white filling) veneer was placed over the retained baby canine to make the tooth look larger as a permanent canine would appear.
- The permanent canine in lateral position was re-shaped and composite added on the corners to make the tooth look like a wider and similar to a lateral incisor
- A small composite filling was placed on the chipped corner of the right central incisor
- A composite veneer was placed onto the peg left lateral incisor to part overlap the left canine
- The lower left canine tip was reduced so as not to interfere with the bite and improve aesthetics
- A night guide (occlusal splint) was made to be worn at night
CASE STUDY 2
Jessica’s pre-treatment photos:-

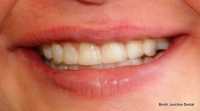
Before: Old dental work, space between two front teeth

After: Minimal dentistry, Whitening, composite veneers amd midline space closed
Jessica wanted a nicer smile with minimal treatment, minimal expense and did not want to replace her front crown.
- Jenny had limited finances and did not want her crown replaced or expensive dental work.
- An old crown on her upper left lateral incisor was much lighter in colour than her front teeth which had darkened over time.
- Her remaining anterior teeth had old stained fillings.
- Her anterior teeth had worn at a faster rate and were now shorter relative to her unworn lateral incisor crown. Her worn anterior teeth needed to look longer.
- Jenny wanted the space (diastema) between her front teeth removed.
- Jenny wanted a broader smile.
After Treatment
- Tooth whitened till the natural teeth approached the colour of the retained upper right crown.
- Old fillings were removed and seven direct composite veneers were bonded directly to her teeth.
- Both central incisors were widened to close the midline space.
- It was not possible to make the lateral incisors exactly the same as Jenny did not want to replace the crown on her right lateral incisor The minor asymmetry was an acceptablecompromise for Jenny.
- Jenny’s smile was made wider by veneering both premolars making the dark space between her teeth and the inside of her cheeks smaller.
CASE STUDY 3
Pre Treatment: George’s problems were: –


- A strong night grinding habit was evident. George tended to grind mainly towards his right side.
- Over many years George had worn down his upper right anterior teeth resulting in an obvious difference between the left and right side of his front teeth.
After Treatment
- Composite (tooth coloured) filling material was placed over the incisal edges of the worn upper three left anterior teeth to make them look longer.
- An occlusal splint was recommended to help control wear from night grinding.
CSAE STUDY 4

Chipped anterior teeth with spacing
After Treatment: Tooth whitening, teeth made slightly longer and spacing closed